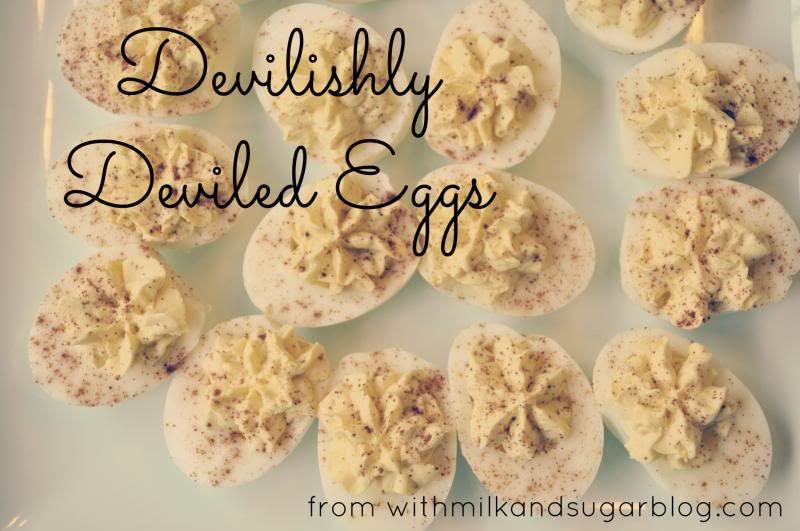
The right deviled egg recipe can turn you into near celebrity status in one perfectly planned summer picnic. Ok, maybe that's an exaggeration. But deviled eggs, when done right, are a crowd-pleaser. When wrong, well... you're more likely to become infamous.
Showing posts with label summer. Show all posts
Sunday, September 1, 2013
Friday, May 31, 2013
Monday, September 3, 2012
Salted Caramel Ice Cream {w/ recipes}
hello friends. hope you had a fabulous long weekend. it sure was hot in San Diego. perfect to enjoy a sweet and salty treat - salted caramel ice cream.
***
If you've been following along with me these last few months, you may remember my post on Salted Caramel Butterscotch Pudding. I must admit, salted caramel is one of my favorite flavors as of late. But up until a few months ago, I had never taken my try at homemade caramel. {On a side note, I had made caramel corn (with brown sugar and butter, a recipe I will share once the weather changes), but not real caramel.}
Having been around the baking/cooking world in the blogosphere and the kitchen for a few years, I had heard many woes about the trouble with caramel. Everything from making sure your pan is completely clean and dry to checking the temperature every 30 seconds. And these woes are with good cause - as of today I have made 2 successful batches, and 2 complete flops.
So now, despite a few botched attempts, I think I have got the hang of it. So hopefully you will have great luck on the first try, and not end up dumping a lumpy caramel-like mess in the trash. In hopes of your instant success, here are some of my tips.
Salted Caramel Ice Cream
Salted Caramel Sauce
1 c sugar
1 1/4 c heavy cream
1 t vanilla
1/2 t fleur de sel (flaky sea salt) {or to taste, up to 1 t}
1. In a 10 inch pan, heat sugar over medium heat. It will be helpful to use a light colored pan so you can better gauge the color, but not necessary. Using a fork, mix sugar so that it heats evenly. STOP mixing once the sugar begins to melt. Do not mix even just a little, as it will start to clump and not melt evenly. DO swirl the pan around so that the sugar continues to melt evenly. Continue until sugar is completely melted and begins to turn a rich caramel color.
2. Once the sugar reaches the desired color, reduce heat and add heavy cream, stirring until combined.
This step threw me for a loop the first time (my second attempt, since the first attempt resulted in clumpy melted sugar that I scrapped before this step). I assumed the hot, melted sugar and the cream would easily mix together. All recipes said to just mix the cream and sugar until it blends together. And they are completely right. What they don't tell you is that it looks like a complete wreck - the sugar will turn into a sticky, tacky mess and want nothing to do with the chilled cream. And can you blame it? The sugar had a good thing going on. And the heavy cream came and messed it all up. But, keep stirring. They'll work through their issues and turn into a beautiful, sweet caramel.
3. Remove from heat and add vanilla and salt.
***
If you've been following along with me these last few months, you may remember my post on Salted Caramel Butterscotch Pudding. I must admit, salted caramel is one of my favorite flavors as of late. But up until a few months ago, I had never taken my try at homemade caramel. {On a side note, I had made caramel corn (with brown sugar and butter, a recipe I will share once the weather changes), but not real caramel.}
Having been around the baking/cooking world in the blogosphere and the kitchen for a few years, I had heard many woes about the trouble with caramel. Everything from making sure your pan is completely clean and dry to checking the temperature every 30 seconds. And these woes are with good cause - as of today I have made 2 successful batches, and 2 complete flops.
So now, despite a few botched attempts, I think I have got the hang of it. So hopefully you will have great luck on the first try, and not end up dumping a lumpy caramel-like mess in the trash. In hopes of your instant success, here are some of my tips.
Salted Caramel Ice Cream
Salted Caramel Sauce
1 c sugar
1 1/4 c heavy cream
1 t vanilla
1/2 t fleur de sel (flaky sea salt) {or to taste, up to 1 t}
1. In a 10 inch pan, heat sugar over medium heat. It will be helpful to use a light colored pan so you can better gauge the color, but not necessary. Using a fork, mix sugar so that it heats evenly. STOP mixing once the sugar begins to melt. Do not mix even just a little, as it will start to clump and not melt evenly. DO swirl the pan around so that the sugar continues to melt evenly. Continue until sugar is completely melted and begins to turn a rich caramel color.
2. Once the sugar reaches the desired color, reduce heat and add heavy cream, stirring until combined.
This step threw me for a loop the first time (my second attempt, since the first attempt resulted in clumpy melted sugar that I scrapped before this step). I assumed the hot, melted sugar and the cream would easily mix together. All recipes said to just mix the cream and sugar until it blends together. And they are completely right. What they don't tell you is that it looks like a complete wreck - the sugar will turn into a sticky, tacky mess and want nothing to do with the chilled cream. And can you blame it? The sugar had a good thing going on. And the heavy cream came and messed it all up. But, keep stirring. They'll work through their issues and turn into a beautiful, sweet caramel.
3. Remove from heat and add vanilla and salt.
Ice Cream Base
You are of course welcome to use your favorite vanilla ice cream base (just omit the vanilla and most, if not all of the sugar), as the caramel will compensate. I prefer an egg based custard for my ice cream, but this is one of the few flavors where, in my opinion you can get away with just milk and cream. The caramel is just that good.
*adapted from Alton Brown's Vanilla Ice Cream
1 1/2 c half-and-half
1/2 c heavy cream
4 large egg yolks
1/3 c sugar
1. In a medium saucepan, mix half-and-half and heavy cream, over medium heat. Bring mixture to a simmer, stirring occasionally. Remove from heat.
2. In a medium mixing bowl. whisk the eggs until they lighten in color. Gradually add the sugar.
3. Carefully temper the cream mixture into the eggs and sugar, adding small amounts at a time until a third of the mixture has been added. Pour in the remainder and return to the saucepan over low heat. Continue to cook, stirring frequently until mixture thickens enough to coat the back of a spoon and reaches 170 degrees F. Remove from heat and allow to cool 30 minutes.
4. Mix cream mixture with salted caramel and refrigerate at least 4 hours, preferably overnight.
5. Pour into ice cream maker and freeze according to manufacturer's directions, typically 25-35 minutes. Freeze for another 3-4 hours. The ice cream will be softer than normal recipes due to the caramel. It will melt in your mouth, in more ways than one.
Enjoy!
Wednesday, July 18, 2012
Bears at the Beach {w/ cupcakes}
Well, summer is in full swing at the w/ household.
Next week I will be enjoying the sun, swimming, and wakeboarding while on a houseboat trip in Northern California.
I made these fun cupcakes a few weeks ago for a barbeque I hosted. There were some little ones running around and I wanted something festive, but not too time consuming to make. I found this idea in 101 Cupcake, Cookie, and Brownie Recipes, a cookbook from Gooseberry Patch. This book has tons of fun recipes and decorating ideas. They are all pretty simple but the taste is anything but.
I decided to make chocolate cupcakes because
a) its always a crowd pleaser and b) I had a box of mix on hand.
I made a simple buttercream (2 sticks softened butter, about 4 cups powdered sugar, and 1 t vanilla) and separated it into two bowls. Using Wilton icing colors, I created an ocean blue and yellow (sand). If you have yellow sanding sugar you could sprinkle it on top to get a true sand effect.
I used a ruffle decorating tip (#406 from Wilton) to create the wave effect with the blue frosting. I tried a couple different techniques. On some of them I rotated the cupcake so the frosting went around in a circle, like standard frosting but with the ruffle tip. On others I started at one end (the front) and layered the frosting in a back and forth technique until it reached the back. The latter seemed to work best.
I added peach ring candies to serve as water floaties and cut strips of sour belt candies as beach towels.
I saw the same idea on a few other websites, such as Bakerella, where the bears were dressed with icing bikinis and board shorts. I guess my bears were at a swimsuit optional beach.
Overall, a simple way to dress up cupcakes for any summer event.
Thursday, June 21, 2012
Four Years Ago Today...
I was a blushing bride.
And blushing I was indeed. I'm not one for being the center of attention. I would much rather be making a fuss about someone else. Truth be told, I was nervous to be the focus of an entire day. Weeks before my wedding just the thought of hundreds of eyes staring at my every move made my stomach tie itself in knots.
But the amazing thing was, all of those nerves disappeared about a week before the big day. God transformed me into a completely peace-filled woman. It was like my heart beat slowed just enough for me to take deep breaths in and out, soaking up every moment of those last days of being a "fiancee", all in preparation for my biggest role to date - wife.
In celebration of my four year anniversary, I thought I'd share some photos of our day. If you haven't noticed, I don't post photos of myself very often. Well, this will make up for that.
We chose awarm hot summer day to exchange vows in
front of family and friends and officially begin our lives together. Our ceremony was in a garden area of a golf course. It was surrounded by hedges and tall trees - it felt so private.
But the amazing thing was, all of those nerves disappeared about a week before the big day. God transformed me into a completely peace-filled woman. It was like my heart beat slowed just enough for me to take deep breaths in and out, soaking up every moment of those last days of being a "fiancee", all in preparation for my biggest role to date - wife.
In celebration of my four year anniversary, I thought I'd share some photos of our day. If you haven't noticed, I don't post photos of myself very often. Well, this will make up for that.
We chose a
I love gazebos and loved the natural wood look of this one.
We were so blessed to have our closest friends and family stand by our side that day, supporting us every step of the way then... and now.
![]() |
| We were a very lively, goofy bunch. |
We had amazingly talented photographers (who are also friends) that made us feel like we belonged in a magazine shoot.
***
This last picture basically sums of our relationship.
laughing.
always laughing.
Love, here's to countless more years of laughter.
{all photos in this post were taken by the talented team of Flux Photography}
Thursday, May 31, 2012
A Little Garden Update {w/ gardening}
hello folks.
Well, my garden has been growing like crazy. And I'm not even sure how. It seems like just yesterday I planted a few seeds and hoped for the best. Now I've got a jungle out there! Just water, SoCal sunshine, and a little plant food. I used EB Stone Organics Tomato & Vegetable Food and mixed it with the soil before sowing, and sprinkled a pinch in the hole for each seed. Now every week or so sprinkle a little around the base of each plant as I water.
In full disclosure, these photos were actually taken a few weeks ago. Everything is even BIGGER now. I will post some photos I took this past weekend in a few days, but wanted to show an update to give you a middle comparison step. Remember how everything looked a few weeks ago? You can find the post here.
I added a small cucumber plant a few weeks ago (right after I first posted on my garden). This particular type of plant is supposed to do well in a container... fingers crossed.
See that little baby tomato? Someday soon it will grow up and be so yummy in a caprese salad.
Do you garden? If you don't, what would you grow if you did?
Well, my garden has been growing like crazy. And I'm not even sure how. It seems like just yesterday I planted a few seeds and hoped for the best. Now I've got a jungle out there! Just water, SoCal sunshine, and a little plant food. I used EB Stone Organics Tomato & Vegetable Food and mixed it with the soil before sowing, and sprinkled a pinch in the hole for each seed. Now every week or so sprinkle a little around the base of each plant as I water.
In full disclosure, these photos were actually taken a few weeks ago. Everything is even BIGGER now. I will post some photos I took this past weekend in a few days, but wanted to show an update to give you a middle comparison step. Remember how everything looked a few weeks ago? You can find the post here.
I added a small cucumber plant a few weeks ago (right after I first posted on my garden). This particular type of plant is supposed to do well in a container... fingers crossed.
See all that green in the top left and bottom right pictures below? That's my baby spring greens mix. It's already given us a handful of fresh salads. And the zucchini? Yep, they weren't kidding when they said they'd get huge. I still can't believe it came from a small seed.
So far only a few carrots have popped up, despite planting nearly 2 dozen seeds :(
I added some marigolds and pansies for color - plus I've heard marigolds are a natural insect repellant. Speaking of ... I've found a few snails lurking near my plants in the early hours of the morning. So far they haven't devoured much, just a few bottom leaves of my zucchini. The other bugs have been helping themselves to a small salad everyday (how rude!).
The tomato plant has surpassed all my expectations. I've done tomatoes before, but only in containers. They've always been small, and only given a handful on tomatoes. Well this one has taken off. It started as a 6 inch tall seedling and has exploded. I had to get a larger cage to wrap around the plant for added support. I've been trimming away the sucker stems based on a tip from Life On The Balcony. Even after all that I've trimmed, it is still out of control... in a good way.
Do you garden? If you don't, what would you grow if you did?
Subscribe to:
Posts (Atom)