Google+  with milk and sugar blog: decorating
Showing posts with label decorating. Show all posts

Thursday, May 24, 2012

Upcycled Gift Bags {w/ crafts}

hello world.

***

The last few weekends have been filled with children's birthday parties. It's been quite fun actually, lots of cake, baloons, and laughing children. For my second cousin's first birthday I decided to make a personalized gift bag. I'll start by saying that am relatively new to the crafting arena. Luckily this project is very simple and easy, plus it is a "green" way to show you care.


Start with a plain gift bag. I love how Anthropologie uses high quality bags when you make a purchase. There's something about the sturdy paper and soft fabric handles that gets me every time. It's the same feeling I get when I eat out of my favorite floral print bowl and drink out of mason jars. I feel pampered.

I used simple brown paper wrapping and cut it into 2 rectangles to cover the Anthropologie logo on each side and to serve as a background for my letters. I attached it using double sided tape.


I free-handed the letters and then cut them out with an exacto knife, but you can easily use scissors. {and for more precise letters, a stencil}  


I spaced out the letters and taped them down.


The result is a simple, homemade creation.


Monday, May 21, 2012

Easy DIY Shelf {w/ style}

hello friends. how are you today? thought I'd share on a recent project from around the house.

***

Have you ever hit a wall when it comes to home decorating?

When we moved into our condo nearly 4 years ago, I wasn't too concerned with decorating. Don't get me wrong, I wanted to be concerned, but there were more pressing matters. Like putting up drywall, or having a kitchen.

Our DIY home renovations quickly snowballed, leaving us with our refrigerator in the living room and the microwave on the fireplace. Needless to say, it took a few months of heavy remodeling before I was ready to hang picture frames.

But once the dust settled (literally) I set about to decorate. I picked frames, hung decorative shelves and sconces, and bought wall art - all on a limited budget. I've been quite happy with our home decor over the years, and perhaps because of that, I stopped decorating. Which, in a sense is a good thing. I didn't want to keep adding more and more stuff and end up on an episode of Hoarders. But I became stagnant. Which is not a good thing. I stopped browsing through stores, flipping through magazines, looking for new decor ideas. Because, in my mind, there was no use for that. It would only make me want something I couldn't have. Oh the lies our mind tells us sometimes.

Enter the world of Pinterest and blogs. So many amazing ideas. I was inspired. Almost immediately I caught the bug. The design, change, renew, reuse, refashion bug. It's been a good thing. It's challenged me to look at things with new eyes. Instead of "this is the way things are", I now think "how could they be?" And, not to get too philosophical on you, but shouldn't we have this outlook on other things in life as well?

So... my dining room wall. It's been seriously lacking in design for the last few years. I hung some cheap wall art, a few sconces. It's been driving me crazy for the last year. But I didn't know what to do.

My overall interior design style is classic with clean lines. But lately I've been loving the juxtaposition of clean lines with a more earthy feel and some rustic pieces, a la Pottery Barn. I decided to build a shelf out of a 2x6 piece of wood, and apply the vinegar stain used in this project to make it look like reclaimed wood.

I picked out a piece of wood from one of the extras in our garage and the hubby cut and sanded it to the right size. I applied the vinegar stain using the same technique as before.

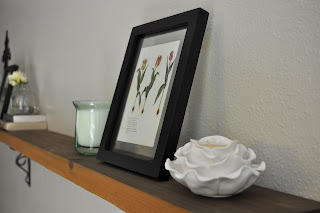
We attached them to simple brass shelf brackets and then attached it the wall. Voila!


An instant new vibe to the same space. I kept the same wall sconces and added some candles, books, and framed these prints from Vintage Printables.


I also added a mini Martinelli's apple juice bottle that I've been using as a vase to hold clippings from my garden.


Sunday, April 29, 2012

Bookcase Restyling

hello world. I hope you're prepared, this post is a long one.

***

This project has been a long time coming.

You see these bookcases have been calling my name, begging me to make them pretty for months now.

I found them at Target about 3 years ago when we had just started to settle into our place after nearly 6 months of heavy remodeling {will post more on this later}.

Needless to say, the bookcases were my attempt to fill a large empty space and store everything from books to photo frames to candles and knick knacks. Here are the "before" pictures.


They were a quick fix, and I do love how they fit perfectly right beneath the stair rail and leave little pockets of the wall as a perfect showcase for special photos.  But, over the years they've gathered more and more STUFF and turned into a black hole of sorts. They are a bit heavy looking, and much too dark for our small space.


I've been "pinning" different inspirations of bookcase stylings for the last few months, trying to figure out what I'll do with them.

I decided that first things first, I needed to remove the backing. The bookcases are particle board, which doesn't look that bad except for the backing. It is that fold down the middle, half a centimeter thick, barely wood, type of wood backing. Once I unscrewed the back board and left it open to the wall it looked so much better! It's a wonder what a little subtraction really adds sometimes.


Next, it was time to get rid of all that STUFF. I have dozens of books, some from school, others for personal reading, and others I haven't even read (awful, I know!). I tend to keep things for a long time, but once I get the urge to purge I just go with it. I become the most indiscriminate organizer ever. I will get rid of everything. Even things I once considered sentimental. But for this project, I didn't intend to really get rid of that much, just decide what should be displayed and what can be in storage.

Even though I wanted to clear out a majority of the books and trinkets, I still wanted to add some new items to bring everything together. I've been looking for some decorative items to display for the last few months. I've searched high and low at thrift stores, craft fairs, etc, trying to find unique items that would add some intrigue but still go with our style. I've had no such luck. It doesn't help that I'm a bad shopper. I desperately wish I could have that eye for shopping, to find the one unique piece of beauty in a pile of junk. Instead I usually buy front of the store items, the ones on display and styled the way I like. They are also more expensive.

Since I couldn't find any one of a kind, vintage items, I headed to Michaels for some help. They were having a great sale and along with my 40% off coupon I found some great deals. Steven was surprised when I came home with these ceramic birds. We recently started watching Portlandia and since then always make the "It's a bird, it's art" joke. If you haven't seen the show, be advised, it's definitely on the weird, out there side. But we found it hilarious at times, especially since we both love Portland.


So here is how the bookcases look currently. I'll probably be updating it little by little over the next few weeks. I still have a couple ideas for items I am keeping my eyes open for.

 
Related Posts Plugin for WordPress, Blogger...