Google+  with milk and sugar blog: April 2012

Sunday, April 29, 2012

Bookcase Restyling

hello world. I hope you're prepared, this post is a long one.

***

This project has been a long time coming.

You see these bookcases have been calling my name, begging me to make them pretty for months now.

I found them at Target about 3 years ago when we had just started to settle into our place after nearly 6 months of heavy remodeling {will post more on this later}.

Needless to say, the bookcases were my attempt to fill a large empty space and store everything from books to photo frames to candles and knick knacks. Here are the "before" pictures.


They were a quick fix, and I do love how they fit perfectly right beneath the stair rail and leave little pockets of the wall as a perfect showcase for special photos.  But, over the years they've gathered more and more STUFF and turned into a black hole of sorts. They are a bit heavy looking, and much too dark for our small space.


I've been "pinning" different inspirations of bookcase stylings for the last few months, trying to figure out what I'll do with them.

I decided that first things first, I needed to remove the backing. The bookcases are particle board, which doesn't look that bad except for the backing. It is that fold down the middle, half a centimeter thick, barely wood, type of wood backing. Once I unscrewed the back board and left it open to the wall it looked so much better! It's a wonder what a little subtraction really adds sometimes.


Next, it was time to get rid of all that STUFF. I have dozens of books, some from school, others for personal reading, and others I haven't even read (awful, I know!). I tend to keep things for a long time, but once I get the urge to purge I just go with it. I become the most indiscriminate organizer ever. I will get rid of everything. Even things I once considered sentimental. But for this project, I didn't intend to really get rid of that much, just decide what should be displayed and what can be in storage.

Even though I wanted to clear out a majority of the books and trinkets, I still wanted to add some new items to bring everything together. I've been looking for some decorative items to display for the last few months. I've searched high and low at thrift stores, craft fairs, etc, trying to find unique items that would add some intrigue but still go with our style. I've had no such luck. It doesn't help that I'm a bad shopper. I desperately wish I could have that eye for shopping, to find the one unique piece of beauty in a pile of junk. Instead I usually buy front of the store items, the ones on display and styled the way I like. They are also more expensive.

Since I couldn't find any one of a kind, vintage items, I headed to Michaels for some help. They were having a great sale and along with my 40% off coupon I found some great deals. Steven was surprised when I came home with these ceramic birds. We recently started watching Portlandia and since then always make the "It's a bird, it's art" joke. If you haven't seen the show, be advised, it's definitely on the weird, out there side. But we found it hilarious at times, especially since we both love Portland.


So here is how the bookcases look currently. I'll probably be updating it little by little over the next few weeks. I still have a couple ideas for items I am keeping my eyes open for.


Friday, April 20, 2012

A Funny Named Fruit

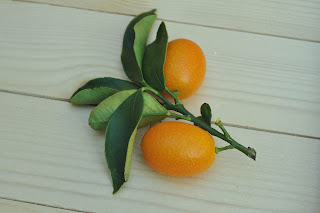
That's right, we're talking about Kumquats.


A fruit that I have only recently discovered. For years I confused them with another "quat", the loquat.

Kumquats however, are quite different. A sweet, edible rind coats an almost unbearably sour, juicy inside. These little bad boys will have you near tears with their sour pucker. But if you're a citrus fan (I am! I am!) you will find them almost addictive.

A co-worker brought in a large bag of them a few weeks ago. I had to be coaxed into eating one. "You mean you eat the rind? Really?" But, being one who is always game to try new things, I gave it a shot. It wasn't long after that I took a handful for myself.

A friend recommended refrigerating them. Not necessary, but a definite enhancement. There's something about eating them cold that brings out the sweet flavor of the rind to perfectly contrast the acidic flesh of the fruit.

Since then I've been on the lookout to find them again. My local grocer, farmer's market.... no such luck, until last night. There they were, packed and saran wrapped in a small basket. Without hesitation I plopped them in my cart. Forget dinner, as soon as I got home I was washing and soon after devouring them. I ate so many my lips were tingling from their sour punch.


As of yet, I've only been eating them on their own. But I found a few recipes around the web in case you'd like to try them prepared. Enjoy!


I'd love to try them, but I can't seem to stop eating them long enough to use them in a recipe. Do you like kumquats?


Sunday, April 15, 2012

Garden Storage Crates

As we keep getting further and further into April, I have this inescable desire to work in the garden. And although the weather in SoCal has been telling a different story, Spring is here!

I picked up a small coiled hose at the hardware store that is the perfect size to reach my new garden bed and to wash off any messes on the deck. We use a drip system to water most everything, but I'm planning to bring in a few potted plants to add some different color and texture. Plus it's just so handy to have an actual hose, even in a small backyard.

The problem is that the hose just sits on the deck. The water spicket is right next to the table, and while its not too much of an eye sore, it doesn't really visually add anything to the space. I decided I wanted a small  crate to store the hose and a few plastic gardening tools. I started asking around and trying to figure out where I could find one. My husband, being the extreme DIYer that he is, decided to make one for me. We set off to the hardware store and picked up a few poplar boards in the hobby section. I kept trying to talk him out of it, saying I'm sure I could buy one that was cheaper (or free), but Steven was persistent. Truth is, he likes to build things. When we got home he went straight to the garage and his worktable to saw, hammer, and nail for about 30 minutes. The result is my perfectly unperfect crate.


My original plan was to let it sit outside for a few months and I'd eventually get the rustic, reclaimed wood style I was going for. Lucky for me, one of the blogs I follow, Lil Blue Boo, had a tutorial on how to get the rustic look in far less time. I followed the instructions using vinegar, steel wool, and tea and here is the result:


I am so happy with the result that I'm planning to get another larger crate and do the same process. I think I'll turn it upside down and use it as a small table for a potted plant. Mayble I'll stencil some words to make it look like an actual vegetable or flower crate. Who knows, the possibilities are endless.


Thursday, April 5, 2012

Salted Caramel Butterscotch Pudding

hello world. How are you today? Tomorrow is Friday! Isn't Friday such a wonderful day? Not just because it's the end of the work week, but because of the mood it seems to put everyone. On Fridays people just seem.... happier. And happy people make me happy. So I thought I'd share a little happiness with you.

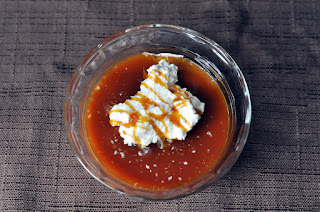
This dessert is delicious. Although I typically prefer less sweet desserts, I am willing to make an exception with this. I first tried it at a great little restaurant in Encinitas, Blue Ribbon Artisan Pizzeria. From the Mason jar lemonade glasses, chalkboard posters, exposed beam ceiling, the interior is almost as delightful as the food. But what they seem to be most known for is their off-menu dessert: a home made butterscotch pudding topped with sea salted caramel and fresh whipped cream. It was divine.


I knew I wanted to recreate it at home. Lucky for me, and you, the restaurant has posted the recipe on their website. How kind is that?

Well, as much as I love a truly home made dessert, sometimes I just want a quick fix. An "I made it at home so it's home made". Because as lovely as this recipe is, sometimes something I can make in 5 minutes will make just as happy.

Made at Home-made Salted Caramel Butterscotch Pudding

1 packet Jello Butterscotch Pudding mix
1 jar of caramel sauce (I used Trader Joe's Fleur de Sel Caramel Sauce)
heavy cream (or a can of whipped cream)
sugar (optional)
fleur de sel (sea salt, or other rock salt)

1. Make butterscotch pudding
2. Heat caramel sauce according to jar
3. Whip heavy cream, adding a little sugar (skip this step if your whipped cream will come from a can)
4. Drizzle caramel sauce over pudding, top with whipped cream. Sprinkle with fleur de sel.


How easy is that? Again, another "not quite a recipe" but when it only takes a few minutes you will be oh so happy.


Related Posts Plugin for WordPress, Blogger...